Short-Term Rentals
Hosts: Enhance Airbnb Photos with Honest AI Edits in One Hour
Airbnb search and ranking systems use multiple signals that can change over time. Treat image quality as one part of listing quality and rely on current first-party guidance rather than a guaranteed ranking effect.
By Hospitality Lens · · 13 min read

Fix one bright, horizontal cover photo first. Then apply targeted edits for exposure, straight horizons, and clutter removal across your first five images. That combination moves click-through rates faster than any other single change you can make. HospitalityLens offers a free watermarked preview if you want to test one photo before committing, but no edit replaces a genuinely unusable source image.
TL;DR:
- The first five listing images, especially the cover photo, significantly influence guest clicks and bookings, making quality visual presentation critical.
- Simple AI edits like exposure correction, horizon straightening, and clutter removal can improve photo trustworthiness without misrepresenting the space.
- Batch editing tools and a focused shooting workflow enable hosts to enhance multiple listings efficiently within an hour.
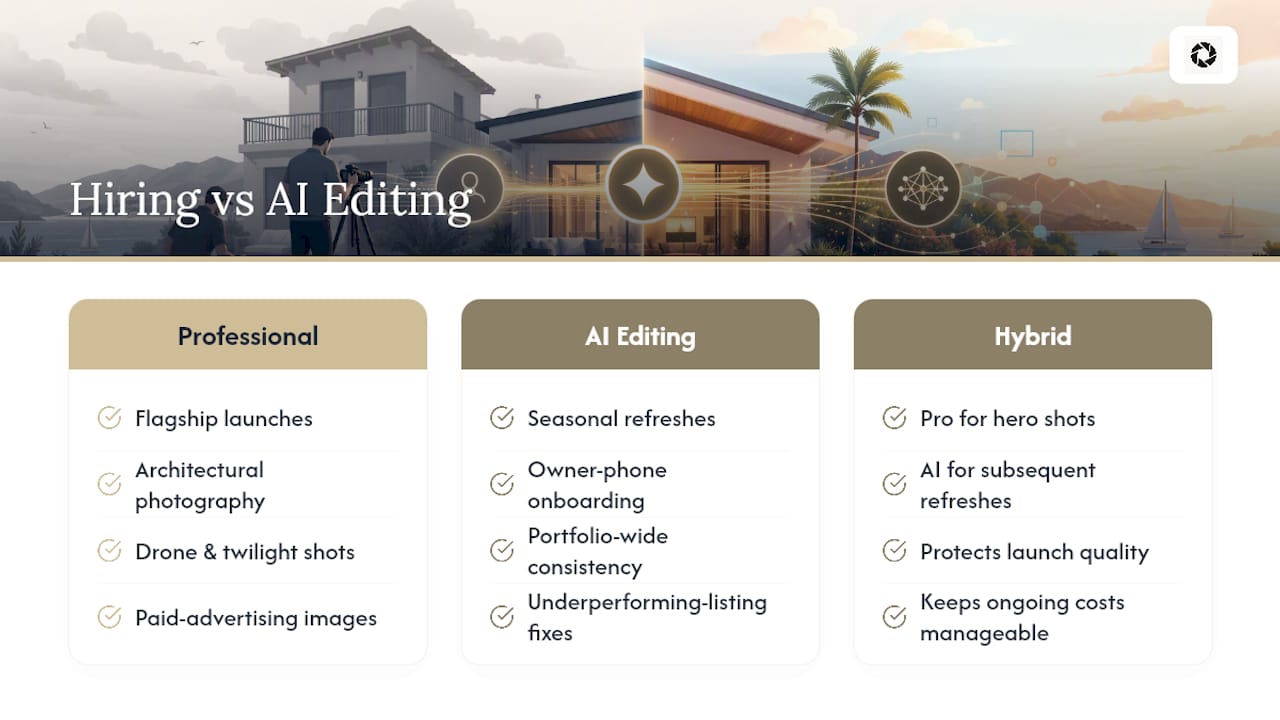
- Professional photography remains essential for flagship launches or complex spaces, while AI editing suits seasonal updates and portfolio consistency.
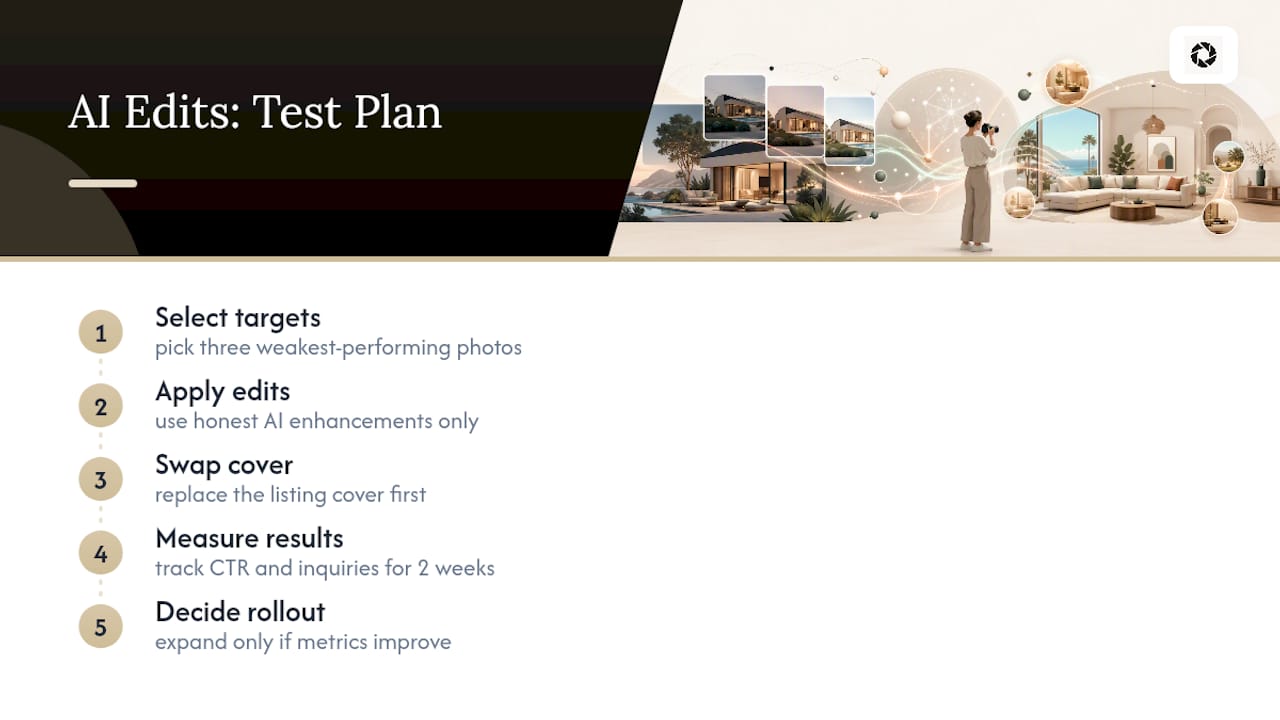
- Hosts should test AI enhancements on one photo first, then evaluate performance before applying edits to the entire gallery.
HospitalityLens
Refresh Your Listing Photos Honestly
Turn usable phone or existing listing photos into realistic, booking-ready images without arranging a new photoshoot.
Try one photo freeTable of Contents
Why Listing Photos Drive Clicks, Bookings, and Guest Trust
Your cover photo does more work than the other 19 images combined. It’s the only image a guest sees while scrolling search results, so it decides whether they even click through to read your description, check your calendar, or compare your price against the listing next door. If it’s dark, crooked, or cluttered, everything else you’ve built, the amenities, the location, the reviews, never gets seen.
Airbnb’s own hosting guidance backs this up directly: the platform tells hosts to shoot horizontal photos with strong natural light, declutter before shooting, and upload high-resolution images because the first photos in a gallery carry most of the weight in a guest’s decision. Airbnb also recommends front-loading your best shots rather than saving them for the middle of the gallery, since most guests don’t scroll through all 20 or 30 images before deciding to click “Book” or move on.
Statistic Callout: Photography guides that study booking behavior converge on a consistent pattern: the first five images in a gallery, hero shot, kitchen, primary bedroom, bathroom, and one standout feature, carry the majority of a guest’s decision weight. Ordering matters more than adding extra photos late in the set.
There’s a second, quieter reason photo quality matters: accuracy. A photo edited to look brighter and cleaner than the actual space creates a mismatch the guest discovers at check-in, and that mismatch shows up in your review scores, not your booking rate. Honest edits that correct lighting and remove clutter protect your accuracy rating. Edits that invent brightness a room doesn’t have, or crop out a wall that makes a bedroom look bigger than it is, put that same rating at risk.
Practical AI Editing and Manual Fixes to Use Right Now
You don’t need a full retouching workflow to see a difference. Five specific fixes account for most of the visible improvement in a listing gallery, and each one solves a distinct problem. Here’s how to use each without overcorrecting.
Auto exposure and shadow recovery. Most owner-submitted and cleaner-taken photos are underexposed, especially interiors shot against a bright window. Practical editing guides recommend a brightness lift of roughly 10 to 20 percent along with a small contrast boost, which recovers shadow detail without blowing out the highlights near windows. Push exposure too far and you lose the texture in curtains, countertops, and upholstery, which reads as artificial rather than well-lit.
Perspective and horizon correction. A tilted horizon or a leaning doorframe is one of the fastest ways to make a listing photo look amateur, and it undermines trust before a guest even registers why. Straightening verticals and leveling horizons also makes rooms read as more spacious, since converging lines subconsciously signal a cramped or distorted space.
Clutter and people removal, with honesty guardrails. Removing a trash can, a cord, or a stray suitcase from a hallway shot is a legitimate cleanup. Removing a structural element, like a support beam, a low ceiling, or a small window, crosses into misrepresentation. The rule is simple: you can remove what doesn’t belong in the room. You cannot remove what defines the room.
Color temperature and contrast. A slight warmth adjustment makes interiors feel inviting rather than clinical, but heavy saturation increases or aggressive filters create the “too good to be true” look that makes experienced guests skeptical. Vacation rental photography guides warn that over-editing with saturation or heavy filters backfires by misrepresenting how the space actually looks, which erodes trust rather than building it.
Crop and sharpen for mobile thumbnails. Most guests browse on a phone, where your cover photo shrinks to a thumbnail roughly the size of a postage stamp. A photo that looks sharp on a desktop monitor can turn to mush at thumbnail size. Crop tighter on the strongest visual element, add light sharpening, and always preview the final crop on an actual phone screen before uploading.
- Auto exposure and shadow recovery fix underexposed rooms without flattening highlight detail.
- Perspective correction fixes tilted verticals and makes rooms read as larger and more trustworthy.
- Clutter and object removal cleans up distractions but should never touch structural features.
- Color temperature adjustments should stay subtle enough that the room still looks real, not staged.
- Cropping and sharpening for mobile thumbnails is the step most hosts skip and shouldn’t.
Pro Tip: Edit your cover photo last, after you’ve settled on the other four hero shots. The cover needs to match the tone of the images that follow it, and editing it first often means redoing it once you see the full set.
For readers who want a deeper walkthrough of exposure and color fixes specifically, see how to brighten interior listing photos well.
A One-Hour Shoot and Batch-Edit Workflow That Scales
You don’t need a professional photography schedule to get a usable set of source images. A single focused hour, plus a batch edit pass, covers most standard one-bedroom to three-bedroom listings.
- Prep the space first. Declutter every surface you plan to shoot, decide which two or three features are your “hero” selling points (a view, a soaking tub, a fireplace), and check your light. Photography guides consistently point to the golden window hours, early morning or late afternoon, as the best natural light for interiors.
- Shoot with intention. Use your phone’s grid overlay to keep horizons level, shoot in horizontal orientation only, and work from corners or doorways to capture depth rather than standing in the center of a room. Airbnb search and ranking systems use multiple signals that can change over time. Treat image quality as one part of listing quality and rely on current first-party guidance rather than a guaranteed ranking effect.
- Build a room shot list before you start. Kitchen, living area, each bedroom, each bathroom, and any standout amenity should get two to three frames each, one wide and one detail shot. This gives you options during selection instead of forcing you to use a mediocre single frame.
- Select and order your best 20 to 30 images. Photography guides recommend landing in that range for a standard listing, since Airbnb allows more but guests rarely need more to decide. Front-load your strongest five: cover, kitchen, primary bed, primary bath, and your standout feature. Add short captions on any photo where the frame alone doesn’t make the room’s purpose obvious. Airbnb’s platform also lets you build a photo tour and reorder images after upload, so ordering isn’t a one-time decision you’re locked into.
- Batch prep for editing. Organize source images into a folder per property, name files by room (“kitchen_01,” “bath_02”) so nothing gets misplaced, and decide per-image edit scope before you start. A photo that just needs a brightness lift takes seconds; one with a tilted horizon and heavy shadow needs more attention. Run one test image through a free preview first to confirm the edit style matches what the room actually looks like before committing to the full batch.
For managers juggling multiple properties, that batch step is where the workflow either scales or breaks down. See how to improve hotel listing photos fast for batch-specific approaches when you’re handling more than a handful of units.
Not every editing problem needs the same tool, and picking the wrong category wastes both time and money. Four broad categories cover almost every situation a host runs into.
Quick mobile correction apps handle brightness, white balance, and basic straightening in seconds. Free tools like Apple Photos, Google Photos, and Snapseed handle most basic corrections without any subscription cost, and they’re the right choice for a single photo that just needs a brightness nudge.
Automated batch enhancers apply exposure, color, and sharpening corrections across dozens of images at once, which matters if you manage more than two or three properties and don’t have time to edit each photo individually.
Perspective and horizon correctors specialize in fixing converging verticals and tilted lines, a narrow but high-value fix since a crooked photo reads as unprofessional faster than almost any other flaw.
People and object removal tools clean up a stray guest, a parked car, or clutter without altering the room’s actual structure, which is where the honesty guardrail matters most.
When you’re evaluating any of these, the same four questions apply regardless of category:
- Does pricing work per image, or does it lock you into a subscription you don’t need yet?
- What rights do you retain over the final image, and how many revisions are included?
- What’s the actual turnaround time, hours or days?
- Does the edited result still look like the real room, or does it introduce artifacts around edges and windows?
Run a free preview first wherever one’s offered, check the edited image at full resolution for halo artifacts around window frames or furniture edges, and time how long the full turnaround actually takes before you commit to a bulk order.
When Hiring a Professional Photographer Is Worth It
AI edits and DIY shoots have real limits, and pretending otherwise does your listing a disservice. Flagship property launches, architectural photography, drone or twilight shots, and anything going into paid advertising still call for a professional with proper lighting equipment and lens control. Difficult spaces, oddly shaped rooms, tricky mixed lighting, or floor plans that need a wide-angle specialist also tend to benefit from a trained eye on-site.
Where AI editing earns its place is in refreshes: seasonal updates, new-property onboarding when you’ve only got the previous owner’s phone photos, portfolio-wide consistency across a dozen units, and fixing underperforming listings without booking a new shoot. Many operators land on a hybrid approach: hire a photographer once for the true hero shots, then use AI edits for every refresh and every new property afterward. That combination protects the launch quality while keeping ongoing costs manageable.
How HospitalityLens Handles Enhancement Honestly
Free watermarked preview. Pay only if you like it. No card is required to create the free watermarked preview. See current pricing for unlocks, one-time packs, and subscriptions.
What We’ve Learned About AI Editing vs. Professional Photography
AI editing is a genuinely cost-effective option for the refresh work that eats up a host’s time: seasonal updates, new listings with only phone photos, portfolios that need visual consistency across a dozen units. It is not a universal substitute for a photographer shooting a flagship launch or an architecturally ambitious space, and any service that implies otherwise is overselling its own tool.
Our honest recommendation: don’t roll out AI edits across your entire portfolio on faith. Enhance three of your weakest-performing photos, replace just the cover image first, and track your click-through rate and inquiry volume over a couple of weeks before you touch the rest of the gallery. That small test tells you more than any promise a tool can make about itself.
— The HospitalityLens Team
Try One Photo Free Before You Commit to a Full Gallery
You’ve read the fixes. Now test one before spending anything. HospitalityLens lets you try one photo free, with a watermarked preview so you can judge the exposure, color, and perspective correction before paying a cent.

If the preview looks right, the finished watermark-free image costs a specific fee, with a number of revisions included, which may credit toward larger packs or subscriptions. Solo hosts refreshing a single listing can choose from various photo packs, while property managers with multiple units may find subscription tiers that include additional revisions and tiered pricing per photo. If you’re managing a portfolio rather than one unit, the property manager plans are built specifically for that volume, with the step-by-step guide walking through ordering and batch upload once you’re ready to move past a single test photo.
Sources
FAQ
How Do I Make My Airbnb Photos Look Good?
Shoot horizontal photos in natural light, declutter every room, straighten horizons, and lift exposure by roughly 10 to 20 percent, then lead your gallery with your strongest cover shot and four supporting images.
What Is the 80/20 Rule for Airbnb Listings?
Image quality can influence how people evaluate a listing, but there is no universal performance uplift that applies to every property. Measure clicks, inquiries, bookings, or sales on the individual listing.
What Is the 20-60-20 Rule in Photography?
Definitions vary across photography communities, and there’s no single agreed-upon standard for this rule as applied to listing photos, so treat any specific breakdown you see online with caution rather than as a fixed formula.
How Much Should I Pay for Airbnb Photography?
Professional Airbnb photography rates vary widely by market and property size, and this article doesn’t set a universal price. For a lower-cost alternative on refreshes and bulk edits, a per-photo AI enhancement option like HospitalityLens starts as low as $12 for a single finished image.
Can AI Editing Replace a Professional Photographer Entirely?
No. AI editing works well for lighting, color, perspective, and clutter fixes on existing photos, but flagship launches, architectural shoots, and advertising campaigns still benefit from a professional photographer on-site.
Recommended