Short-Term Rentals
4 Week Split Test to Find Your Best Airbnb Cover Photo
Airbnb search and ranking systems use multiple signals that can change over time. Treat image quality as one part of listing quality and rely on current first-party guidance rather than a guaranteed ranking effect.
By Hospitality Lens · · 15 min read
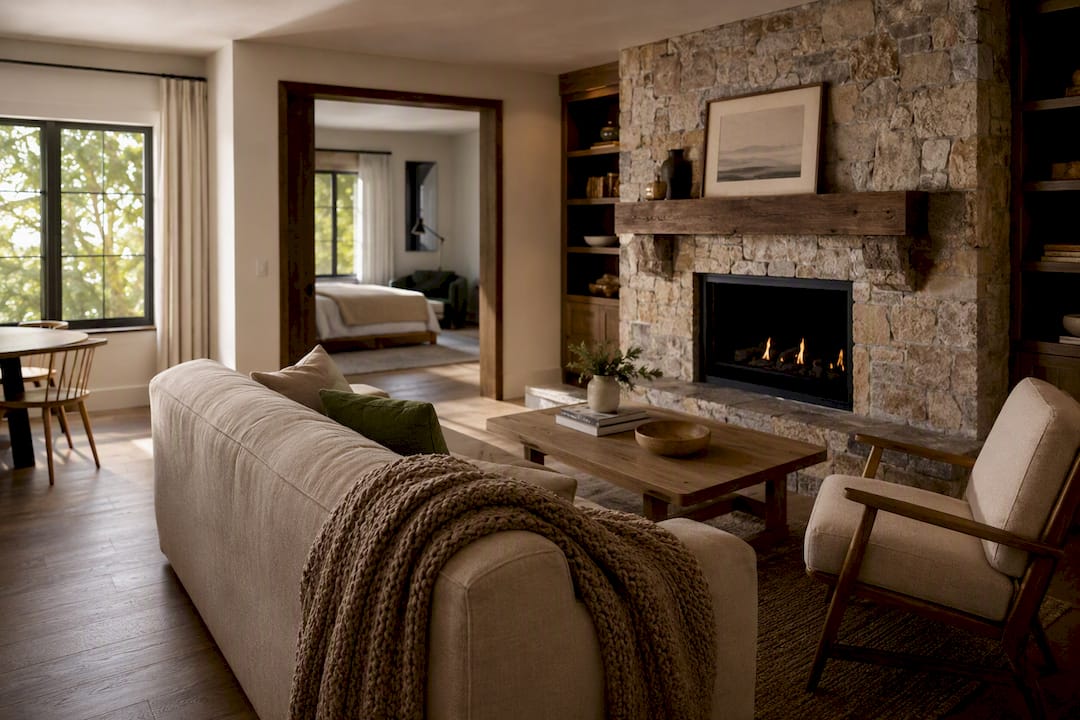
Yes, you can set your own Airbnb cover photo through the Listings editor, and Airbnb’s help documentation confirms hosts control this directly. The catch is that Airbnb’s photo tour and its ranking systems sometimes reshuffle images behind the scenes, so a selection that stuck last month may not hold today. Set it, then check it. Verify your cover in guest-facing search results within a few days, and again after any listing edit.
TL;DR:
- The cover photo’s placement in search results heavily influences click rates, with a well-lit interior shot outperforming exterior or cluttered images.
- Rechecking and reasserting your cover photo after any listing change is crucial, as Airbnb’s ranking algorithm may automatically shuffle images without notification.
- Optimal cover photos feature natural lighting, a sense of depth through angled shots, and subtle human or lived-in elements to evoke comfort and authenticity.
- Conduct split tests of different cover images over several weeks, focusing on impressions and click-through rates to identify the most effective visual strategy.
- Improving existing photos with AI enhancement tools offers a quick, cost-effective way to boost quality before investing in a full reshoot.
HospitalityLens
Refresh Your Airbnb Cover Photo
Turn a usable phone or listing photo into a realistic, booking-ready image while preserving the property’s actual details.
Try one photoTable of Contents
How to Change Your Airbnb Cover Photo (Desktop and Mobile)
Setting an Airbnb cover photo takes under two minutes once you know where Airbnb buries the control.
On desktop:
- Go to your Listings dashboard and select the property.
- Click into “Photos” or “Photo tour.”
- Open “All photos” and click the image you want as your lead shot.
- Select “Make cover photo” and confirm the save.
On the mobile app:
- Tap “Listings,” choose the property, then “Edit listing.”
- Tap “Photos,” then “Photo tour” or “All photos.”
- Tap the image you want, then choose “Make cover photo.”
Airbnb’s Photo tour help article confirms this exact path and explains how the tool sorts and reorders images by room. If the change doesn’t appear right away, clear the app cache, use “View as guest” to check what’s actually live, and give it a few hours. If it still won’t stick after 24 hours, contact Airbnb support directly.
Why the Cover Photo Matters More Than Any Other Image
The cover photo is the first, and often only, image a potential guest sees before deciding whether to tap into your listing at all. Independent photo audits estimate the cover photo drives roughly 70 to 80% of clicks a search-result tile receives, which means every other photo in your gallery only matters if that first one earns the click.
Image quality can influence how people evaluate a listing, but there is no universal performance uplift that applies to every property. Measure clicks, inquiries, bookings, or sales on the individual listing.
What this means practically:
- Your cover photo needs to answer “what does it feel like to stay here?” in under a second.
- It should match your title and top amenity claims, so guests aren’t disappointed by a mismatch once they click through.
- A technically sharp photo of the wrong room beats a blurry photo of the right one, but a sharp photo of the right room beats both.
Does Airbnb’s AI Change Your Cover Photo Automatically?
Airbnb search and ranking systems use multiple signals that can change over time. Treat image quality as one part of listing quality and rely on current first-party guidance rather than a guaranteed ranking effect. That part is transparent and documented. What’s murkier is what happens after you’ve made a manual choice.
Host discussion threads describe cases where Airbnb’s ranking systems appear to re-select a different lead image after a host had already set one, sometimes tied to “optimize my photos” style features. This is anecdotal, not officially documented behavior from Airbnb, but enough hosts report it that it’s worth building a habit around.
Controls worth using:
- Re-check your cover photo after any listing edit, price change, or new photo upload.
- Reassert your choice by re-selecting “Make cover photo” if it has drifted.
- Use Insights data to confirm your intended image is actually the one guests are seeing in search.
Pro Tip: If Airbnb seems to be ignoring your selection, don’t fight it once. Reselect it, wait 24 to 72 hours, and test a slightly different crop or angle of the same room before assuming the system is broken.
Airbnb Photo Requirements and Cover Photo Composition Rules
Airbnb’s photo guidelines call for high-resolution images, natural color, and no text, logos, or collages layered onto the shot. Airbnb’s own Experience photo guidance reinforces this: candid, well-lit, unfiltered images perform better than anything that looks manipulated.
Technical basics to hit before you upload:
- Shoot in landscape orientation whenever possible; it renders better across both desktop and mobile search tiles.
- Aim for genuinely high resolution. Grainy or compressed images get flagged as low quality and lose visual weight in the grid.
- Skip watermarks, stickers, and any text overlay entirely.
Composition matters as much as resolution; for example, a practical listing-photo composition and sequencing can be seen in this example gallery showing practical listing-photo composition and sequencing. One study of top-performing listings found that the strongest cover photos are a single hero interior shot, usually the living room or the property’s one standout feature, shot with visible depth and captured during the room’s best natural light. A small human touch, like a book on a side table or a mug near a window, helps a thumbnail feel lived in rather than staged.
Editing has a ceiling. Modest exposure and color correction is expected and fine. Heavy filters, unrealistic HDR, or sky replacement create a gap between the photo and the actual room, and that gap shows up in guest complaints and lower star ratings after check-in.
Building Your Photo Tour Order (and How Many Photos You Actually Need)
Your cover photo doesn’t work alone. The order behind it either builds guest confidence or triggers doubt within the first few taps.
- Position 1 (cover): Your strongest hero shot, the room that sells the stay.
- Position 2: Primary bedroom.
- Position 3: Kitchen or dining area.
- Position 4: Bathroom. This one surprises hosts, but hiding the bathroom causes early drop-off because guests worry about it and stop scrolling to find reassurance.
- Positions 5 through 7: Secondary selling features, like a patio, view, or unique amenity.
- Positions 8 through 12: Remaining rooms, details, and neighborhood or location shots.
On photo count, the same audit data points to a practical floor of 15 photos and a target of 20 to 25. Past 25, each added photo needs to earn its place with something genuinely unique, since returns flatten fast beyond that range. Reordering is a drag-and-drop action inside the Photo tour editor, and short, honest captions on each image reduce the mismatch between what guests expect and what they find at check-in.
A Practical Split-Test Playbook for Your Cover Photo
Guessing which cover photo works best is optional. A structured 4-week rotation test gives you an actual answer instead of a hunch.
- Pick four candidates across different categories: a wide hero-room shot, an amenity close-up, a photo with a subtle human element, and an architectural or evening-mood shot.
- Rotate one per week, keeping price, title, and calendar availability locked so nothing else skews the comparison.
- Track impressions, page views, click-through rate, and booking rate in that order, since each stage filters out noise from the one before it.
- Wait for enough impressions before judging a winner. A photo with only 40 impressions hasn’t told you anything yet; the playbook recommends extending any test that hasn’t cleared a reasonable impression threshold.
- Airbnb search and ranking systems use multiple signals that can change over time. Treat image quality as one part of listing quality and rely on current first-party guidance rather than a guaranteed ranking effect.
Photographer or AI Enhancement: Which Fits Your Cover Photo Situation
A new photoshoot isn’t always the right call, and it isn’t always overkill either. It depends on what you’re starting with.
AI-based photo enhancement makes sense when you already have usable phone photos, cleaner-submitted images, or an existing listing gallery that just needs cleanup: better lighting, straighter horizons, less clutter, more polish. It’s also the practical choice when you’re refreshing a portfolio of properties fast, or fixing one underperforming listing without booking a shoot for a single photo.
A professional photographer is still the better call for flagship launches, architectural detail shots, brand-new angles you don’t already have, or properties where the existing photos are too far gone to fix. If that’s your situation, HospitalityLens maintains a photographer directory for hosts who need that route.
Free watermarked preview. Pay only if you like it. No card is required to create the free watermarked preview. See current pricing for unlocks, one-time packs, and subscriptions.
Image quality can influence how people evaluate a listing, but there is no universal performance uplift that applies to every property. Measure clicks, inquiries, bookings, or sales on the individual listing.
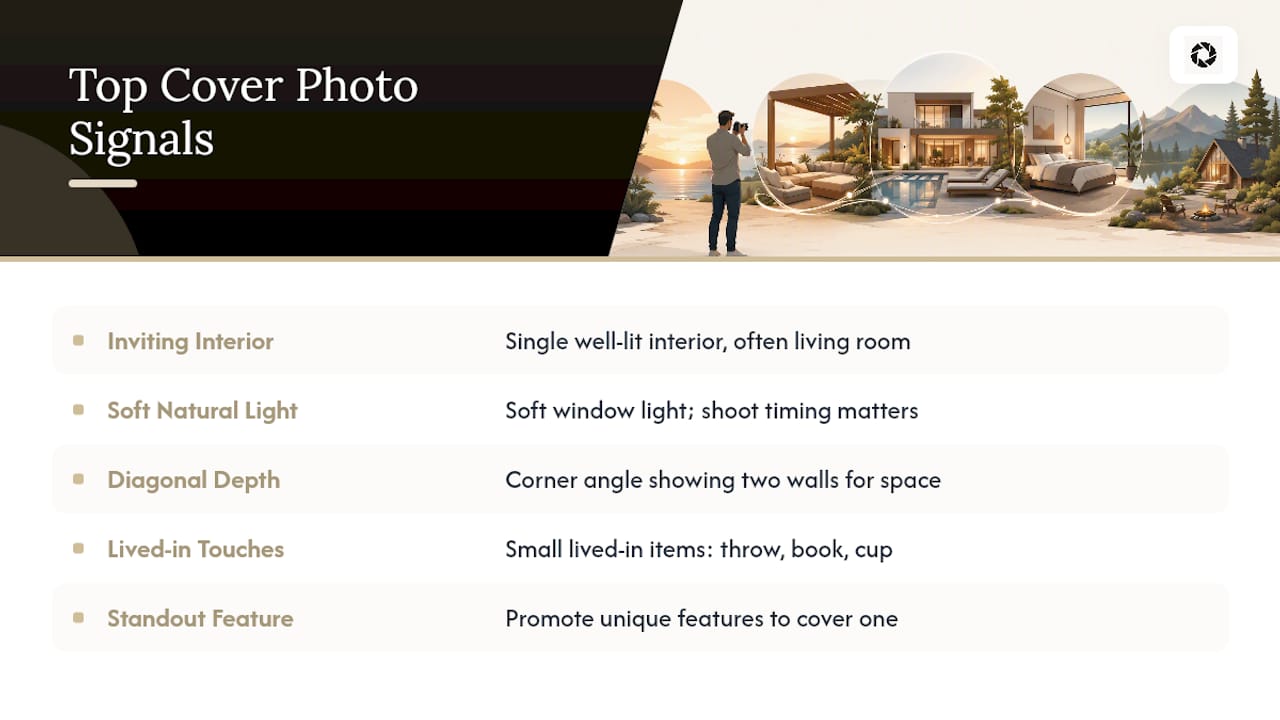
Look at the covers on consistently booked listings and a pattern shows up fast: almost none of them are exterior shots. The best-performing covers tend to be a single well-lit interior, usually the living room, styled with warmth rather than showroom sterility.
Natural light is doing most of the work in these photos. A living room shot at 9 AM with soft window light and a made bed in frame reads as inviting; the same room at noon with harsh overhead light looks flat and forgettable. Timing the shoot matters more than most hosts assume.
Depth also separates a strong cover from an average one. Photos shot straight into a wall from the doorway feel cramped even in large rooms, while a shot taken from a corner, angled to show two walls and a sense of the room’s shape, reads as spacious regardless of square footage. A diagonal composition consistently outperforms a flat, head-on angle.
The strongest examples also include a small human or lived-in element, a throw blanket draped over a chair, a book left open on a table, a coffee cup near a window seat. It signals comfort without needing a person in frame. Sterile, hotel-catalog staging tends to underperform against rooms that look like someone could relax there right now.
Unique architectural or natural features, a fireplace, a soaking tub with a view, exposed beams, get promoted to cover status more often on top-performing listings than generic living rooms do. If your property has one standout feature, it usually belongs in position one, not buried at photo 14.
Common Mistakes Hosts Make Choosing a Cover Photo
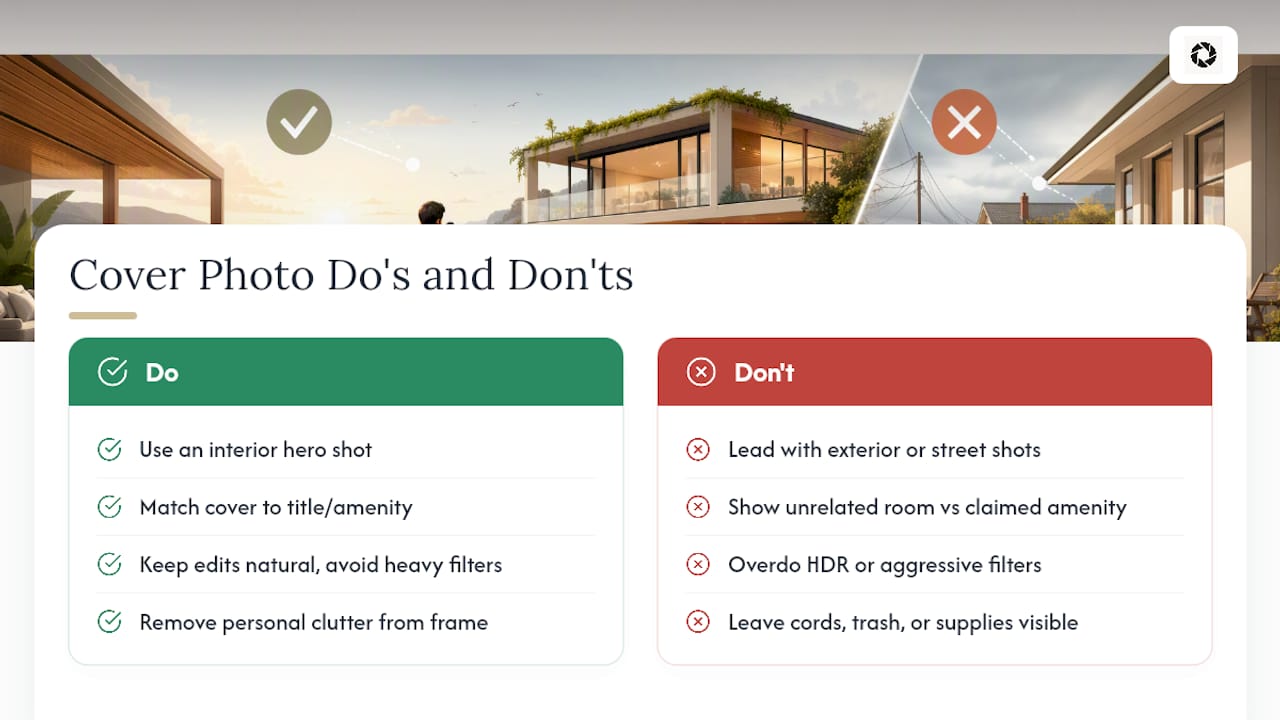
The most common mistake is leading with an exterior shot of the building or street view. Guests already know what a house looks like from outside; what they’re deciding is whether the inside feels right for them; the exterior almost never earns that decision on its own.
A close second is choosing a photo that doesn’t match the listing title or top amenity claims. If your title mentions a lake view and your cover shows the bedroom, you’ve created a small gap of doubt before the guest has even opened the listing.
Overedited photos cause quieter damage. A cover photo pushed through heavy HDR or an aggressive color filter can look more attractive in the search grid and then create a “this doesn’t match what I saw” complaint at check-in, which shows up in reviews later.
Clutter is another frequent problem, especially with owner-submitted or cleaner-taken photos: personal items, cords, trash cans, and cleaning supplies left in frame. None of this is hard to fix, but it’s routinely missed because the person taking the photo is focused on speed, not staging.
Finally, hosts often set a cover photo once and never check it again. Given how Airbnb’s photo tour and ranking systems can quietly reshuffle images, a cover that looked right in January can drift by spring without any notification that it changed.
Our Take: Stop Treating the Cover Photo as a One-Time Decision
Most advice on Airbnb cover photos treats it as a single choice you make once and move on from. That’s the wrong model. Airbnb search and ranking systems use multiple signals that can change over time. Treat image quality as one part of listing quality and rely on current first-party guidance rather than a guaranteed ranking effect.
The conventional advice to “just pick your best photo” undersells how much composition and lighting timing matter within that best photo. A technically fine shot of the wrong room, at the wrong time of day, will consistently underperform a well-lit shot of a less impressive room.
What we’d prioritize first, ahead of chasing new angles or a full reshoot: audit what you already have, confirm your current cover is actually the one guests see, and run one real split test before spending money on new photography. Most listings don’t have a photography problem. They have a selection and verification problem, and that’s fixable in an afternoon.
— The HospitalityLens Team
Try One Enhanced Cover Photo Free Before You Pay for Anything
If your current cover photo is decent but not doing its job, a full reshoot is rarely the first move to consider. HospitalityLens fixes the actual problems holding a cover photo back, dim lighting, a crooked horizon, clutter in frame, without inventing rooms, views, or amenities that aren’t there.

Free watermarked preview. Pay only if you like it. No card is required to create the free watermarked preview. See current pricing for unlocks, one-time packs, and subscriptions.
This isn’t virtual staging and it won’t add a view or a feature that doesn’t exist. It’s the fastest way to find out if your current cover photo just needed better light and a straighter horizon, or if it genuinely needs a new shoot. Try your first photo free and see which one it is.
Sources
FAQ
Can I Choose My Own Cover Photo on Airbnb?
Yes. Open your Listings dashboard, go to Photos or Photo tour, select the image you want, and choose “Make cover photo.” Airbnb’s Photo tour documentation confirms hosts control this setting directly, though it’s worth rechecking after major listing edits.
What Are the Photo Requirements for Airbnb Listings?
Airbnb requires high-resolution images with natural color and no text, logos, or watermarks layered on top, and it discourages collages. Airbnb’s photo resource guidance recommends landscape orientation and genuinely sharp, well-lit shots over anything filtered or staged.
What Is the 80/20 Rule for Airbnb Cover Photos?
There’s no single official “80/20 rule” from Airbnb itself. Image quality can influence how people evaluate a listing, but there is no universal performance uplift that applies to every property. Measure clicks, inquiries, bookings, or sales on the individual listing.
Can an Airbnb Host Ask for a Picture of Your ID?
Airbnb’s identity verification is typically handled through the platform’s own verification system rather than a host directly collecting a guest’s ID photo. Hosts should rely on Airbnb’s built-in verification tools instead of requesting ID images independently.
What Is the 75-55 Rule in Airbnb?
This isn’t an official Airbnb term, and definitions circulating online vary inconsistently enough that no single version can be stated as fact. Treat any claim about fixed percentage “rules” with skepticism unless sourced directly from Airbnb.
Recommended